Week 3 Design Showcase
September 13, 2014
Instructions
Students will choose ONE of the three files located on Dropbox to work with for this assignment.
After choosing your image, you must edit to demonstrate your understanding of topics covered this week.
For your .PSD:
- Adjust the image size to be 8 inches wide OR 8 inches tall if vertical image.
- For purposes of this assignment, keep at 300 dpi and as RGB
Editing must include:
- Clone some additional flowers into your image.
- Create an adjustment layer of your choosing except for black/white.
- Mask an area of your choosing
- Use at least one: Dodge, Burn, Sponge
- Use at least one: Blur, Sharpen, Smudge
- Use at least one Image > Variation
- Create an additional adjustment layer using black and white. Adjust the opacity of this layer. (Tip: Don’t forget you can toggle off when creating your various final jpgs).
Files:
- Please upload both a .PSD and the color .JPG to Sakai for submission. Layers should be noted and organized. Save your file as lastname_designshowcase3.psd
- Your blog however should have a web-optimized .jpg of both the original AND your edit of the final image in color AND your edit of the image in black and white in order to show comparison. (72 dpi, converted to RGB), for a total of 3 images.
——–
- Resized
- Cloned light pink flowers above the bush and placed on their own layer titled “cloned flowers”
- Applied Channel Mixer Adjustment Layer with a gradient from bottom to top that made the flowers a bit redder.
- Duplicated the original layer and created a mask placing as the bottom layer. Used Magic Wand to select the top of the lamp and applied a 10% black (or grey) fill to subtly wash out or lose the top part of the lamp
- Burned light bulb in lamp to make lighter
- I then applied a smudge to the bulb to make it taller
- I then sharpened the edges of the bulb to reduce the blur from the smudge effect
- I duplicated the original one more time then apply a Levels change to create the variation.
 For this week’s assignment, we were asked to select an image and make a series of changes/modifications to it. I selected the lamp in the garden photo seen here as image 001.
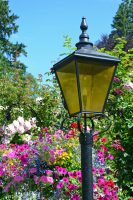
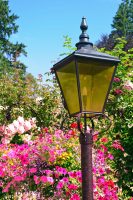
Initially, I resized the image to the height of 8 inches, given it was a vertical photo. Next, I cloned several of the pink flowers, which you can see in file 002 off to the left of the image.
 After which, I applied an Channel Mixer Adjustment Layer to make the flowers a bit more red and pink. The effect was applied via the gradient tool to start toward the bottom of the photo and fade out toward the blue sky. You can see this effect in image 003.
 Next, working with a duplicate of the original image, I created a mask selecting the very topmost part of the lamp and adding a 10% black (or grey) to help fade out the very top point of the lamp as if it was original or made of a different material, as seen in image 004.
It was also in this layer that I Burned the light bulb within the lamp itself to make it stronger given it’s a daylight photo and the bulb isn’t illuminated. I also wanted to extend the bulb to be slightly taller, which I accomplished using the Smudge Tool. I then Sharpened the area directly around the bulb to help reduce some of the blur that was introduced with the Smudge.
 For the Variation, working from a duplicate layer of the original artwork again, I applied a Levels change making the image more saturated and darker, as you can see in image 005.
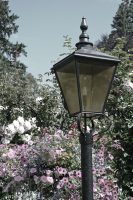 Finally, I created a Black & White Adjustment layer with an 80% opacity and applied to the previous working version and shown here as image 006. This resulted in an image that looks crisp, but with the color washed out from the flowers, sky and the lamp. The slight hue in the flowers make the image feel almost painting-like that’s been sunwashed.
Post Tags:
Layers, Photoshop, VIC5325,